Quick Answer:
Turn off water supplies to appliances first, remove aerators and shower heads, then flush cold water from a tub spout or hose bib until it runs clear. After cold is clear, flush the hot lines the same way. Clean and flush toilets last, reinstall screens, then turn appliance supplies back on and run a short test on each appliance one at a time.
Why This Happens
When the water service is shut off and restored, sediment, rust, and debris that sat in pipes or were disturbed by work can be pushed into your home plumbing. This can clog screens, cartridge valves, and solenoids or foul filters. See Sediment buildup after curb stop work and Preventing sediment damage after shutoff for more on how loose material travels and how to reduce damage.
Step-by-Step What to Do
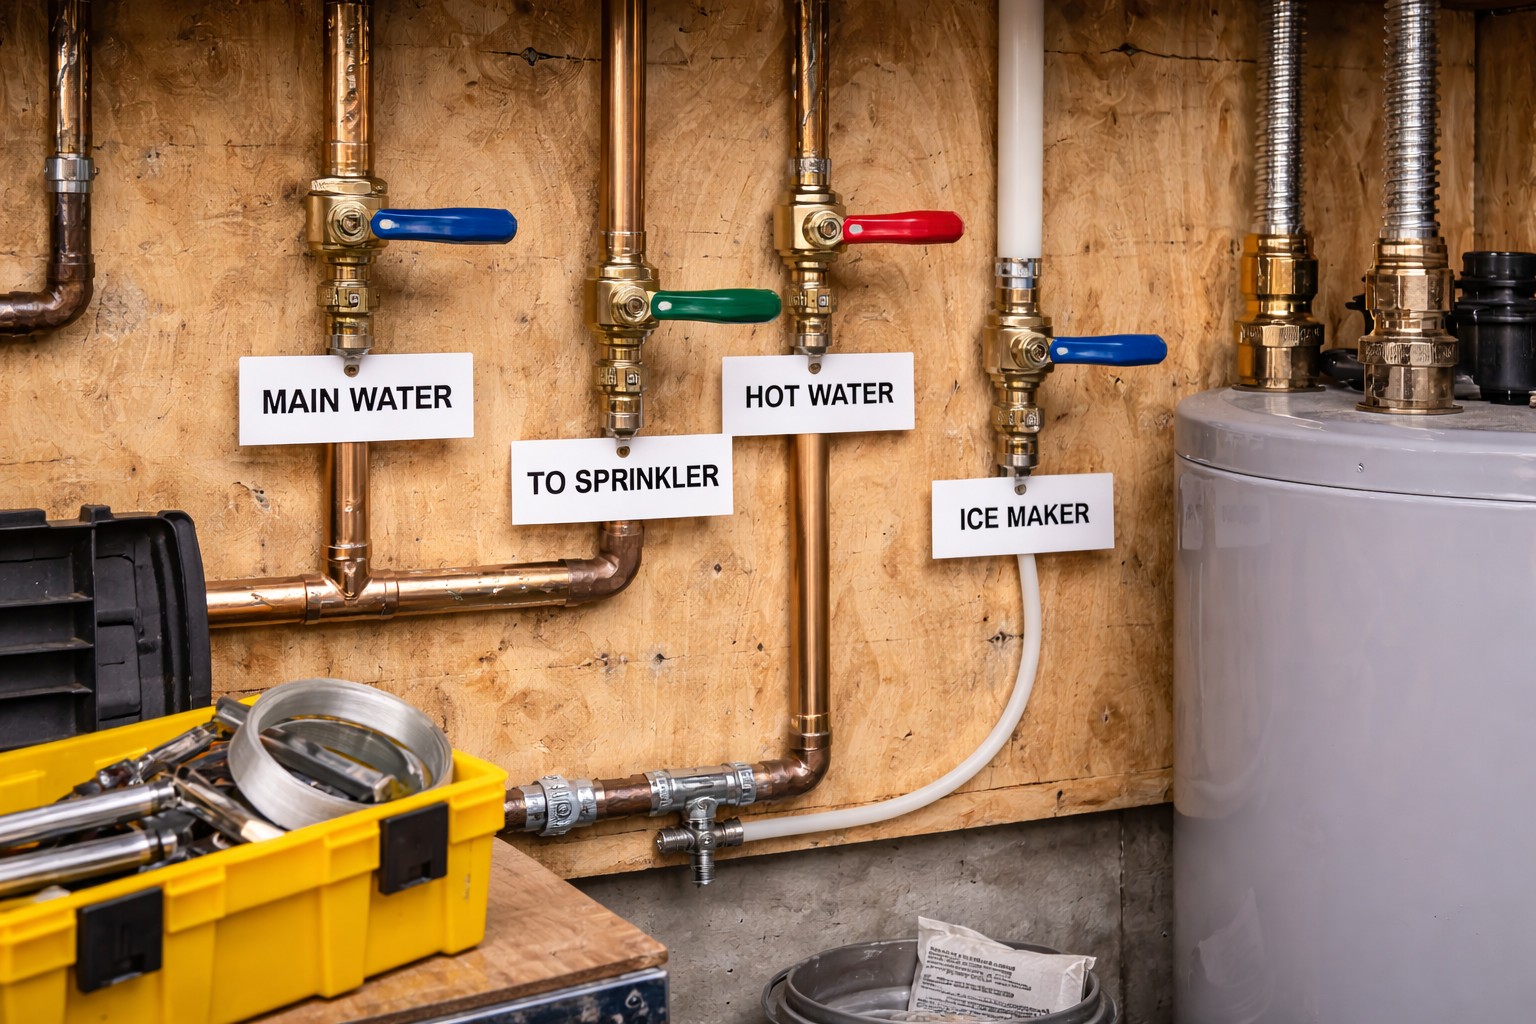
Step 1 — Prepare and gather supplies
- Have towels, a bucket, pliers or a screwdriver for aerators, and a small container to hold screens.
- Keep a flashlight and a notebook to note valves you closed or tests you run.
Step 2 — Turn off appliance supplies
- Close the water supply valves to appliances that have solenoids, cartridges, or filters: dishwasher, ice maker, refrigerator water line, washing machine, water softener, and inline filter housings.
- Turning these off prevents sediment from entering delicate parts and avoids damaging cartridges or solenoids during the flush.
Step 3 — Remove aerators and shower heads
- Unscrew faucet aerators and remove shower heads so any debris can flow freely out of the lines without clogging screens.
- Place screens in a container so you can clean them and know which goes back where.
Step 4 — Flush cold lines first from a tub spout or hose bib
- Open a tub spout or an outdoor hose bib on the cold side. Let the cold water run until it is clear and free of visible particles. This may take several minutes depending on how much sediment is present.
- If you have more than one service entrance or meter stub, start at the location closest to the meter and move through the house.
Step 5 — Then flush the hot lines the same way
- Once cold water is clear, open the hot side at the same tub spout or hose bib and run until the water clears. Hot lines can trap sediment from the water heater, so allow extra time if you see discoloration.
- Be cautious of hot water temperatures when running hot lines.
Step 6 — Clean and flush toilets last
- Flush toilets after the main line flushing so any debris left in branch lines is washed away. Check tank fill and bowl clarity.
- If you have multiple toilets, flush them one at a time and ensure refill valves operate normally.
Step 7 — Reinstall screens and aerators
- Clean or replace the screens and aerators, then reinstall them. If they are heavily corroded or damaged, replace them.
Step 8 — Run a short appliance test one at a time
- Turn appliance supplies back on and run a brief cycle or water draw on each appliance one at a time (refrigerator dispenser, dishwasher rinse, washing machine small fill). Watch for leaks, strange noises, or poor flow.
- Check inline filters and filter housings; replace filter cartridges if they collected sediment.
What Not to Do
- Don’t open every faucet simultaneously; controlled flushing protects cartridges.
- Don’t run appliances (dishwasher, ice maker) while you are flushing lines—turn their supplies off until you test them later.
- Don’t ignore discolored water or strong odors after a reasonable flush time—if color or particles continue, stop and get help.
When to Call a Professional
- If water remains discolored or contains particles after thorough flushing.
- If you find low pressure in multiple fixtures that does not improve with flushing.
- If you see leaks, sustained sputtering, or if any appliance shows signs of internal damage (noisy solenoid, failure to refill properly).
- If sediment repeatedly returns, a plumber can inspect the service line, meter, and any treatment equipment.
Safety Notes
- Avoid scalding: verify hot water temperature before placing hands under running hot water. Start with cold, then switch to hot when instructed.
- Wear gloves and eye protection when cleaning screens if water is dirty or rusty.
- Keep floors dry and watch for slipping hazards when flushing inside the house.
- Do not attempt major repairs on gas-powered appliances or electrical components—shut power off and call a technician if needed.
Common Homeowner Questions
- How long should I flush each line? Run until water is visually clear; usually a few minutes per outlet but longer if sediment is visible.
- Do I need to replace faucet screens or filters? Replace any screen or cartridge that is clogged, corroded, or damaged—clean reusable screens first.
- Can I use appliances immediately after flushing? Turn their supplies back on and run a short test one at a time; don’t return everything to service at once.