Quick Answer:
If one faucet is weak while the rest of the house feels normal, it’s almost always a local issue — blocked aerator, partially closed angle stop, a kinked supply line, or a dirty/failing cartridge. Start by confirming other fixtures are fine, then work through the aerator, angle stops, and supply lines. If those don’t fix it, flush the stop into a bucket and inspect the cartridge.
Why This Happens
- Mineral deposits or debris collect in the aerator or the small screens inside the angle stop or cartridge.
- Flexible supply lines under the sink can get pinched or kinked during installation or when items are stored in the cabinet.
- Individual faucet cartridges or valves wear or clog over time, reducing flow at that one fixture only.
- If you see the same pattern in a shower or only on one temperature side, consider related articles: **Shower has low pressure but rest of house is fine** and **Low pressure on cold side only at one fixture**.
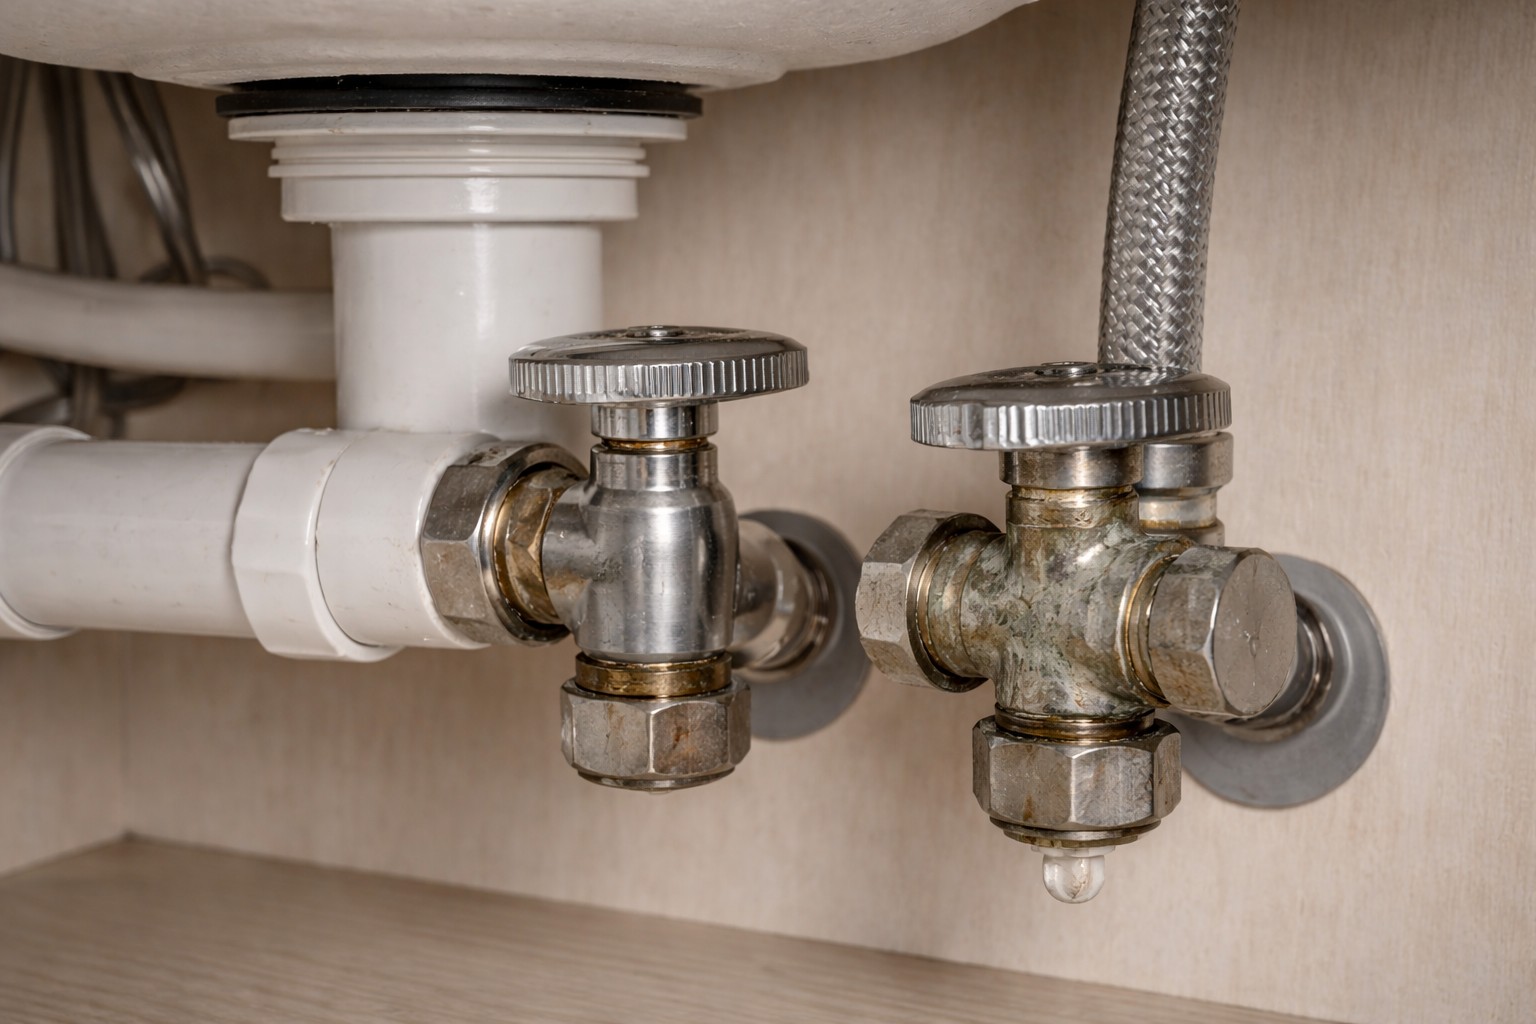
Step-by-Step What to Do
1. Confirm other fixtures are normal
Turn on several faucets (kitchen, another bathroom, an outside hose) and run both hot and cold. If those fixtures supply normal pressure, the problem is localized to the one faucet.
2. Fully open the angle stops
- Look under the sink and find the angle stops (the shutoff valves for hot and cold). Make sure each is turned fully counterclockwise — give them a gentle quarter-turn if they feel tight. Partially closed stops are a common cause.
3. Remove and clean the aerator
- Unscrew the aerator at the tip of the faucet spout. Use pliers with a cloth to protect the finish if it’s stuck.
- Check the screen for grit or mineral deposits. Rinse it or soak in vinegar for 15–30 minutes, then rinse and reinstall.
- Test the faucet after replacing the aerator; many low-pressure problems are fixed here.
4. Check supply lines for kinks
- Look at the flexible supply lines under the sink. Straighten any kinks or bends and make sure the lines aren’t crushed by stored items.
- If a line is damaged or very old, plan to replace it — do not try to repair a damaged braided line yourself unless you are confident with plumbing connections.
5. Flush the stop into a bucket and inspect the faucet cartridge
- With the aerator removed and a bucket under the spout, open the angle stops fully and briefly open the faucet to let water flush into the bucket. This clears debris trapped in the valve or supply piping to the faucet.
- If flushing improves flow, reassemble and test. If it does not, shut the angle stops off before disassembling the faucet to inspect the cartridge or valve.
- Remove the handle and cartridge per the manufacturer instructions, inspect for debris or damage, and clean with water or a vinegar soak if mineral deposits are present. Replace the cartridge if it’s corroded or worn.
What Not to Do
- Don’t start adjusting the PRV—this is almost always a local screen/stop/cartridge issue.
- Don’t force fittings or use excessive torque on chrome finishes — you can strip threads or damage the finish.
- Don’t disconnect the supply lines without having the angle stops fully closed and towels/buckets ready to catch water.
When to Call a Professional
- If you shut the angle stops off and the faucet still leaks or you can’t restore normal flow after cleaning and flushing.
- If the cartridge is seized, corroded, or a replacement is hard to source or install.
- If you find corroded or split supply lines, or suspect a more complex valve or access issue inside the wall.
Safety Notes
- Wear eye protection when flushing lines or working under the sink to avoid splashback.
- Turn off the angle stops before removing internal faucet parts to prevent unexpected water release.
- Keep a bucket and towels handy for small spills. If you are unsure about shutting off water to the house, call a pro.
Common Homeowner Questions
- Why did this start suddenly? A piece of debris or a mineral deposit often dislodges and lodges in the aerator, stop, or cartridge, which can cause an abrupt drop in flow.
- Will cleaning the aerator always fix it? Not always. Cleaning the aerator is the easiest first step, but the problem can be deeper in the shutoff valve or cartridge.
- Is replacing the cartridge hard? It can be straightforward on many faucets, but it helps to have the exact replacement part and the right tools; otherwise call a plumber.
For more related articles, see the Low Pressure at Single Fixture hub.