Quick Answer:
If the overflow behaves badly after recent plumbing work, the first thing to check is the drain assembly under the sink. Small misalignments between the overflow tube and the drain tailpiece or a loose slip nut are common after repairs and are usually easy to fix. Start by visually inspecting the connections, then run a simple water test to confirm where water is traveling.
Why This Happens
During repairs the pop-up, drain flange, or tailpiece is often removed or shifted. When parts are reinstalled a hairline misalignment or a slightly loose nut can change how the overflow water reaches the drain. If the overflow tube does not line up cleanly with the drain tailpiece, water can back up, spill out under the sink, or pool in the overflow channel instead of flowing down the drain.
This is also why you might see issues like Overflow backs up randomly or the overflow trap holding odors — the path is altered and debris can sit where it shouldn’t.
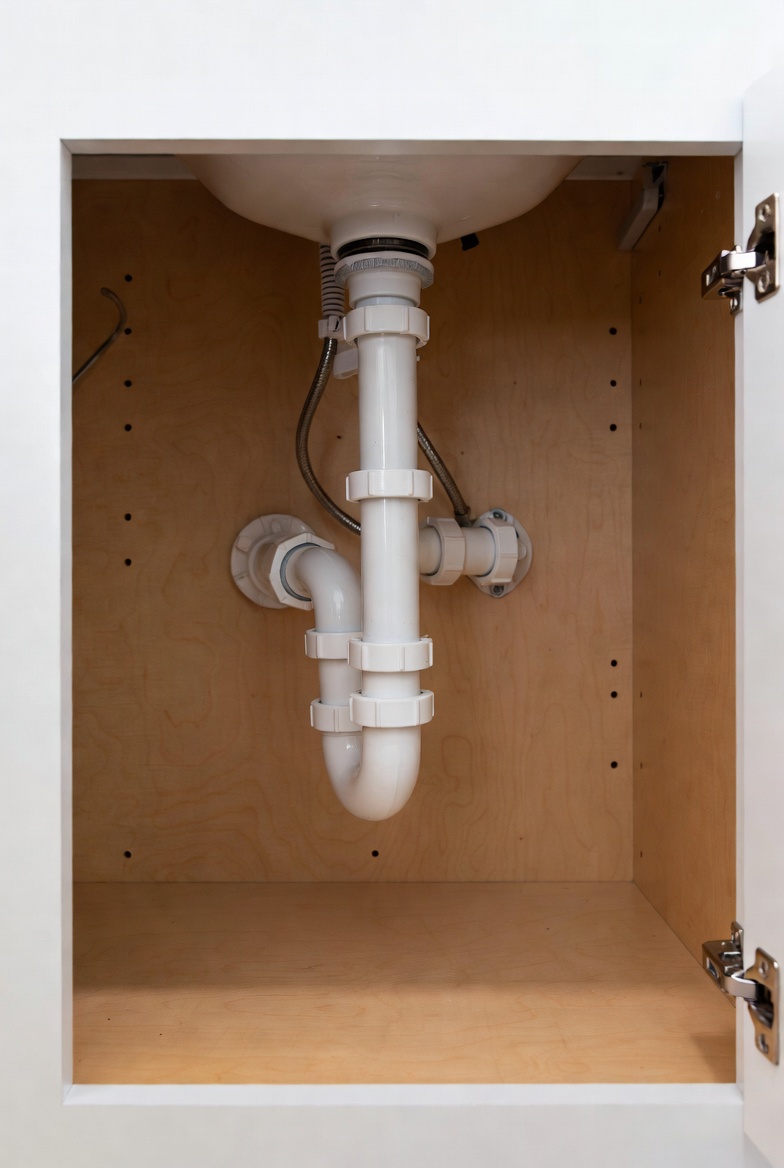
Step-by-Step What to Do
Step 1 — Gather simple tools and protect the area
- Put a small bucket under the drain to catch drips.
- Have a flashlight, adjustable wrench or pliers, and some towels handy.
- If you removed any parts during the original repair, keep them nearby so you can compare.
Step 2 — Inspect the drain assembly and overflow tube alignment
- Open the cabinet and look straight up at the tailpiece and the overflow tube connection. Verify the overflow tube runs directly into or beside the tailpiece without kinks or gaps.
- Check that slip nuts and washers are seated properly and finger-tight first. A misaligned washer can push the tube off-center.
- Verify the drain assembly parts are not shifted left or right compared to the sink center; small offsets can redirect overflow water.
Step 3 — Tighten and realign gently
- Loosen the slip nut slightly, realign the overflow tube so it points straight into the tailpiece, then retighten by hand and finish with a quarter turn using a wrench. Do not overtighten.
- If a gasket or washer looks flattened, replace it or reposition it so the seal is even.
Step 4 — Test the overflow path
- Fill the sink to the overflow level using a cup or small container rather than running a full faucet stream.
- Watch inside the cabinet to see if water flows down the tailpiece properly or drips elsewhere.
- If water backs up or leaks, note exactly where — at a joint, from a crack, or from a gap between tubes.
Step 5 — Clear minor blockages if needed
- If alignment is good but water still backs up, there may be a partial clog in the tailpiece or p-trap. Remove the p-trap into your bucket, inspect and clear debris, then reinstall.
- After reassembly, rerun the test and check for leaks at every joint.
What Not to Do
- Do not assume the plumber ‘did nothing wrong’—small misalignments after repairs are common and fixable.
- Do not overtighten slip nuts or drain flange parts; that can crack fittings or strip threads.
- Do not pour harsh chemical drain cleaners into the overflow as a first fix; they can damage seals and are unsafe near exposed pipes and finishes.
When to Call a Professional
- Persistent overflow after you’ve checked alignment and cleared the trap.
- Active leaks from cracked parts or where metal is damaged.
- Problems that involve the garbage disposal or main drain stack, or if you find sewer odors that won’t clear — for example, if the **Overflow hole smells bad** after cleaning attempts.
- If you’re uncomfortable working under the sink or can’t stop the leak.
Safety Notes
- Turn off water supply valves only if you’re prepared to reseal and test connections.
- Wear gloves to protect from sharp metal edges and old gunk in the trap.
- Disconnect power to the garbage disposal before working on or near it.
- Avoid aggressive chemical cleaners when metal parts are exposed; use mechanical cleaning first (manual removal of debris).
Common Homeowner Questions
- Why did this start right after the repair? Small shifts during reassembly are common; a washer or nut may not be seated exactly as before.
- Can I fix it myself? Often yes — realigning and gently tightening the overflow tube and slip nuts fixes many issues.
- How long should the test take? A few minutes of filling to overflow level is enough to confirm the path and catch most leaks.